Showing posts with label trunk development. Show all posts

Sunday, 19 December 2021

Melaleuca "Back from the Dead" - three year update

I've been very slack with updating my progress on my trees over the last few years, and especially since Covid arrived on the scene. For months I only did the bare minimum required to keep my trees alive, and though I've now been putting a lot of effort into bringing my trees back into shape, sadly I've still been neglecting my blog.

One big change I've made over the last year is that I've overcome my obsessive documenting of every bit of work I've done on my trees. My trees are benefitting because it means I'm working harder on them than I did in the days when I felt compelled to set up the camera to photograph everything from a trunk chop to a minor haircut. However it means that there are less photos that I'll be able to use in my blog. A computer crash also means that some of my earlier photos are trapped on a computer which I hope to get repaired one day.

I was horrified to see how long it is since I mentioned my "Back from the Dead" Melaleuca. It's changed a lot since I last wrote about it in April 2018.

This is how it looks today.

It was a long time since its previous chop as I waited for the leader to reach a suitable thickness. This is how long the leader was before its latest chop earlier this week.


It's come a long way since I nearly killed it almost four years ago.

Now I'll wait and see what grows lower down. If a suitable leader develops I may till shorten it further. Or perhaps I'll just keep its current quirky shape.

Progression photos, which will include future updates and hopefully photos to fill the three year gap, can be found here.

Tuesday, 5 March 2019

The Second Ficus

Yesterday's post was all about the first of my two neglected ficuses, a tree which had benefited greatly from the development of a vigorous and totally unplanned sacrifice branch.

At the time I had not yet done anything to its sibling aside from removing a few dead branches. I've just finished working on that one - it received much harsher treatment than yesterday's tree because the trunk was long and straight with very little taper.

Ficus Natalensis - March 2019

I started by removing the top section, which left potential for something approximating a formal upright tree:


I contemplated stopping there. However I'm trying to focus on short fat trees rather than tall skinny ones, so I knew I wouldn't be happy with that in the long term.

In the end I stuck to my original plan and cut to the lowest branch, leaving what is currently a very ugly tree.

March 2019 - after the chop

No point in wiring that branch because I don't plan to use it as a leader. It's just a sacrifice branch which will be removed along with approximately half the trunk once I get growth where I really want it.

Both trees - March 2019

I can't wait to see what these trees look like a year from now.


Monday, 4 March 2019

The Benefit of Neglect

I hate to admit that the last time I worked on my two neglected ficuses was when I repotted them in November 2015. Because of time constraints only one ever made it into my previous blog post and once again that's the only one I've had time to work on so far. Coincidentally, for the moment it's the better tree.

In November 2015 that tree looked like this:

Ficus Natalensis - November 2015

A few sharp bends and hardly any taper!

Although my neglect means that the trees are no closer to being bonsai than they were three years ago, the move to bigger pots has allowed them to grow big and tall and their trunks have fattened up considerably. Unfortunately the top growth has blocked light from the lower part of the trees and as a result, both have lost some lower branches. The tree above also developed a massive low branch which grew upwards, reaching a height  twice that of the intended apex.

Same tree - March 2019

Under the circumstances I found myself having to treat it as nursery stock when I took it to a workshop on Saturday afternoon.

First I had to get both trees out of the greenhouse though, and that proved to be quite a mission as once again one had sent a root into the other one's pot and both had also sent roots through the slats of the shelf they were living on. To complicated matters further, the neighbouring orchid (a gift which I tend to ignore) had sent roots into both pots. That meant there were quite a lot of roots that had to be cut before I could move the trees.

Once at the workshop the first step was to remove that huge branch.

After removing the huge branch

The tree was already looking better but it was rather top heavy, with a leader growing in the wrong direction. The club member I was working with recommended I cut back to a new leader, advice I was happy to follow, as I'd already said in 2015 that "At a later stage I might reduce the height further".

March 2019 - after pruning

As it's still in the same pot, the change in the thickness of the trunk is pretty obvious.

I've left all the aerial roots for now as we're headed into winter. I'll decide whether to keep any of them when I repot the tree in spring - as long as I don't forget!!

As for the second tree, it looked like this when I removed it from the greenhouse:

Second tree - March 2019

I've removed a few dead branches so far and plan to cut it back to the lowest living branch, then wait for back budding before cutting in to a more suitable height. I'd like to make a short, fat little tree from this one.

Monday, 14 May 2018

Growing Big Trees from Small Cuttings

A member of Reddit's bonsai group recently asked me this question:

"What's the thickest you've ever got a tiny cutting up to? Guess I'm wondering what 10 years can do!"

The simple answer is that I made the decision early on  to restrict myself to trees and pots that I'm able to carry unassisted. As a small woman, that limits my ability to grow big trees. Still, some of them have reached a decent size over the years and if it hadn't been for some beginner's mistakes, they would have done even better.

Let's start at the beginning.


May 2018

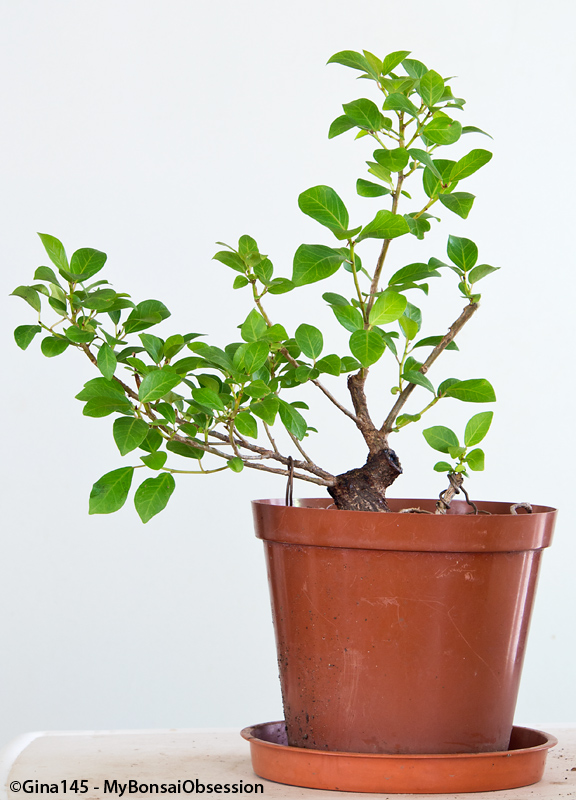
My first Ficus Natalensis cutting serves as a good lesson in how NOT to grow a decent trunk. Yet I was once proud enough of this tree to publish an article about its early development at HubPages. That was long before I ever dreamed of starting my own blog.

I guess it works if you're new to bonsai and you're happy to grow a skinny little tree. Provided you're working with a fast growing species, that is!

After several years in a bonsai pot, this tree has been back in a training pot for over two years now but it's not making as much progress as I'd like. It doesn't help that I rarely think to rotate my trees. The back of this one was close to a wall and it now has quite a bit of die back on the lowest branches. I'll have to work on fixing that next summer.

Measurements:
9cm across the usable nebari (some roots are badly in need of pruning)
5cm just above the roots
Height 34 cm

Sometimes I'm tempted to give this one a total revamp, though probably not what I suggested a few months back. But when I think about it, I tell myself that I should stick to its original styling as a reminder of how I got started in bonsai.

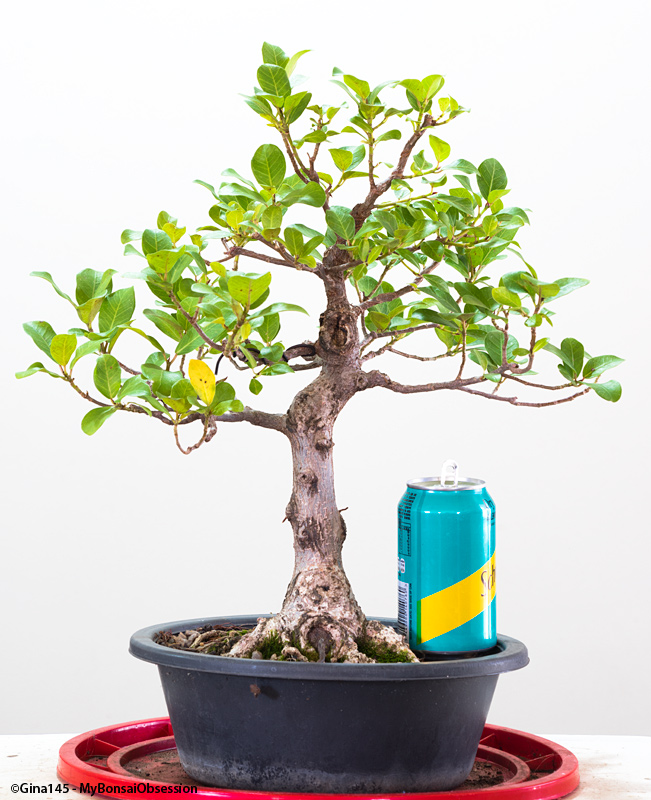
This one is slightly more impressive.


May 2018

I'm guessing that it's approximately 9 years old, though I haven't had a chance to check all my old photos.

Most of the trunk growth occurred quite early in its life, before I made some styling choices I've come to regret. How I wish I'd never removed the lower branches. But what's done is done.

Measurements:
13cm across the nebari
6cm just above the roots
Height 41 cm

I'm seriously tempted to do an air layer here as I think there's good potential for a smaller tree using the top and I can make a short fat one with the bottom part.

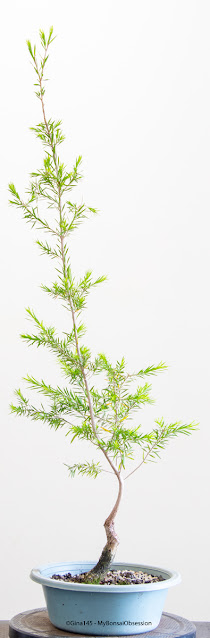
The next one has mostly been allowed to grow unchecked.


May 2018

I'm not sure how old this one is, but it's younger than the other two.

Again I made one cut early on that I now regret. Other than that I've done little pruning, only shortening some branches from time to time. In my crowded bonsai area some of the lower branches haven't been getting enough light though and there's quite a bit of die back. That's not really an issue when it comes to styling because this tree has a trunk chop in its future - probably in the form of an air layer as early as next spring.

I recently discovered an aerial root at the bend which will make the trunk even more impressive when it fattens up.

Close view showing aerial root - May 2018

I'm not sure if I'll still be able to reposition it - I'll have to see about that when the air layer is done.

Measurements:
10-12cm across nebari - depending on final choice of front
6-7cm above roots - exclusing aerial root
Height 99cm

And then there's the easy way.


Fusion project detail - May 2018

If you don't want to wait years for a trunk to fatten up, fuse several cuttings to create one fat tree. My project is relatively small, but that's only because I couldn't cope with anything much bigger. If you've got lots of cuttings and can cope with big trees, the results can be really impressive.

Measurements:
6.5 cm across roots
Height 61cm

I'm sure this one could already have been quite a bit bigger if I hadn't left it in my greenhouse for two years. One summer outside has made a big difference.


Tuesday, 20 March 2018

Choosing the Right Ginseng Ficus

Ginseng Ficus have a really bad name in the world of bonsai and let's face it, a lot of them are really ugly, with huge roots growing in bizarre arrangements. Most of them bear no resemblance to any tree I've ever seen in nature. And yet I've always felt a strange attraction to these peculiar little trees with their fat bases. Especially since I visited Adam Lavigne's blog and saw what a little creativity can do with them.

When it comes to buying Ginseng Ficus, however, I'm hard to please. My trees must have well arranged roots, decent taper... and a low price. Trees like that aren't easy to find, and it took me years to find my first one.

Number one as purchased - June 2013

 I really hadn't planned on buying another until I stumbled upon this one in April 2017:

Number two as purchased - April 2017

The base isn't very different to the first one, but I succumbed to temptation based on my desire to learn from the pruning errors I made with number one.

And then a local supermarket started selling them (wrongly labelled!) far cheaper than they're available anywhere else, so in December 2017 temptation struck once more.

Number three as purchased - December 2017

I really like this one with its single "trunk", complete with a little movement. Sure it's got a bit of reverse taper right now, but after removing the unsuitable aerial roots high up, I buried the lower half of the trunk in river sand to encourage the remaining one to fatten up and possibly to develop more in the right area. Hopefully in time that will help to produce proper taper.

Unsuitable aerial roots removed - December 2017
Potted up with river sand where I want aerial roots to develop - December 2017

Once it was settled in its new pot I removed the unwanted branches below the graft and made the first steps to smoothing out the graft site.

Stub at graft site - January 2018
First steps to smoothing out graft site - January 2018

And in February I realised that the left branch was threatening to take over from the apex, so I shortened it.

Left branch taking over - February 2018

At the same time I did a bit of wiring. This photo shows my proposed new potting angle as the tree is currently leaning over backwards.

Balance restored - February 2018

Number two is getting similar treatment.

Meanwhile in November 2017 I decided the trunk of number one had thickened enough for me to shorten it.

Number one after pruning - November 2017

Due to early mistakes I'm not too happy with the overall shape of the trunk, but hopefully with time (and branch development) that will improve. And hopefully I'll do better with number two and three.

Additional photos including future updates will appear here:

Saturday, 24 February 2018

The Fusion Project

In August 2015 I decided to fuse some of my long, straight Ficus Natalensis cuttings together to create one larger tree.

In order to plant them close together a lot of root pruning was required. Some had fairly substantial roots, so I was able to keep a few of the thickest ones to grow as root cuttings. The two resulting trees are doing well, but I'll discuss those another time.

Once potted I bound the bases together with self-adhesive tape. I'm not sure why I didn't bind them higher up as well, but once done I had this as my starting point:

August 2015

The base looked like this:

August 2015 - detail

As the nights were still cold (August is the end of winter here) I put them back in my greenhouse and due to space constraints they remained there for the next couple of years.

By November 2016 they were growing strongly, but when I removed the tape they were showing no signs of fusing:

November 2016 - detail

I replaced the tape, adding more higher up on the trunk, but didn't think to add movement. Here they are in December 2016:

December 2016

Finally in May 2017 I realised my mistake and tried to wire some movement into them, but after wrapping thick wire around them I found I was unable to bend the wire as much as I wanted to, so I took them to a workshop where my mentor did the muscle work for me.

Wired - May 2017

And in spring 2017 I finally moved them out of the greenhouse into a sunnier spot.

When the wire started biting I removed it and got help in rewiring them to ensure the curves didn't bounce back to their original position. After the wire started biting a second time I decided it was no longer required. This photo was taken a few days ago, several weeks after the wire was removed.

February 2018

Close-up photos show good fusion in some places:

February 2018 - detail of lower trunk

However, in other parts there are still big gaps:

February 2018 - detail of upper trunk with gaps

I added extra tape to this area, so hopefully the gap will soon close.

February 2018 - gap taped

There are a couple of additional photos here. More photos will be added to that page as the tree develops.

Hopefully by next summer the trunk will have developed well enough for me to start thinking about branch selection.

Sunday, 5 March 2017

Clip and Grow Ficus - the Third Chop and Beyond

This little Ficus Natalensis has far exceeded my expectations in terms of the progress it made this summer. When I wrote about its second chop back in September, I was expecting to let it grow unchecked for the rest of the season.

August 2016 - after the second chop

However when I saw how much it had grown by December 2016, I reconsidered my decision.

December 2016 - before pruning

While I knew that the new leader still needed to thicken more, I followed my mentor's advice and cut it back to the third branch to allow it and the two branches growing from it to develop in better proportion. As the leaves were looking rather ragged due to hail damage, I decided to defoliate the tree at the same time.

December 2016 - after pruning and defoliation

It soon filled out again.

February 2017 - before pruning

A few days ago when I brought it inside to get a  photo for this post,  I realised that the branch on the right was becoming too dominant so I shortened that one.

February 2017 - after pruning

And that I expect will be the last work I do on it for quite some time. Hopefully now the branches will thicken in better proportion.

The two bottom branches on the left will probably be removed at a later date as there is no branch to balance the composition on the right hand side. With the frame that is starting to develop higher up, I suspect that once the tree fattens up, it won't need branches so low down anyway.

The root cutting has finally decided it wants to become another tree.

February 2017 - base of trunk and root cutting

With winter approaching I've decided to leave it with its parent tree until early next summer, so the move to a larger pot will have to wait.

Saturday, 28 January 2017

A Year Spent Watching a Trident Maple Grow

At some stages in a tree's development it's best to do nothing other than leave it to grow. Such was the situation with the Trident Maple I first discussed in my post Building a Trunk in late 2015.

It was unfortunate that I was forced to repot that tree at the time that I cut the trunk back because I'm sure that the heavy root pruning I did back then has slowed its development somewhat. Still it's grown a lot since I picked my new leader - the lower of the two options I discussed in that post. The thin flimsy leader  has thickened substantially and now extends about three feet above the chop site. I also have a branch where there was little more than a bud when that post was written. This is what it looked like after a year of unrestrained growth.

January 2017- before trim and wiring

I won't even think about shortening that leader for at least another year as it's not thick enough yet. Besides I'd like to fatten up the trunk a bit more too.

When I brought it inside today, the photo above was all I had planned but on closer inspection I decided it was time to position the side branch properly while it's still young and flexible. At the same time I shortened the branch because, for now, my main focus is on thickening the leader. I don't want that branch to fatten up too much until I start developing other branches either because I'd hate it to grow out of proportion to the rest of the tree.

Branch pruned and wired. The leader was left intact.

Just when I thought that I was done I realised that I needed to clean away the moss growing up the base of the trunk. In so doing I discovered that the base is actually somewhat thicker than I realised. Rotating the tree I also found that the base looks better from what I thought was the back of the tree, while the rest of the tree doesn't really suffer from a change of front.

New front. The section below the wire was hidden by the moss.

I'll need to change the slant when I repot it because it's now leaning slightly backwards, but that's only a minor issue. I'll also have to remove the root marked with an arrow in the photo below.

View of base from old and new fronts.

As it's already late in the growing season I'm planning to leave dealing with both of those issues until spring when I'll probably move the tree into a bigger pot.

I've been battling with this tree for years now, but at last I feel like it's starting to show some promise. It still has a long way to go though.

Monday, 2 January 2017

Most of them survived

In October 2015 I wrote about a newly acquired Stinkwood tree which was drowning in Maple seedlings.

Weeds and seedlings - October 2015

With a little gentle poking around in the surface soil I was able to extract 25 seedlings, each of which was planted in a small plastic cup with drainage holes.

23 of them survived.

For the last year they've been living largely untouched on the lower shelf of a small stand in a fairly sheltered area - a spot chosen to protect them from the hail which has left some of my better trees looking rather the worse for wear.

Now they've had a chance to grow a bit its time to start putting movement into some of their trunks.

Before starting work I decided to bring them inside for a family photo:

23 seedlings - January 2017

That was when I discovered that, while the front ones had been growing vigorously, some of those at the back were still tiny and were nowhere near ready for me to work on.

Size comparison

Clearly those needed a lighter spot.

I decided to relocate some of the other trees on the stand so that the smaller seedlings could be moved forward without compromising the position of the bigger ones.

After returning the weakest trees to the stand I was left with 15 trees to wire. I've started work but it will probably take a few days to wire them all.

I've been fairly conservative with the movement I put into the biggest tree.

Tallest tree after wiring

I'll try to be more adventurous with some of the others.

Friday, 25 November 2016

Here’s my Ginseng Ficus

I don’t often talk about my Ginseng Ficus because they’re frowned upon by most serious bonsai artists. That was one of the first things I learnt when I joined my bonsai club, but if anything it just made me feel I’d like to challenge myself by seeing what I could do with one.

Once I’d decided to buy one, my goal was to find a tree with roots that weren’t too bizarre. Not an easy mission! I don’t know how many years it took before I found one that I was happy to give a home. It’s not a spectacular tree (yet??) but it has no peculiar bulges, and all-importantly it has taper.

Of course when I bought it, it also had a horrible straight cut with a thin ‘trunk’ grafted on one side – a problem that only time could solve. I wasn’t even prepared to start work tidying up that cut back then because I was afraid that the graft wouldn’t hold.

Here it is as purchased in June 2013 in a tiny plastic container which wasn’t even worthy of being called a pot.

Ginseng Ficus - June 2013

Naturally the first thing I had to do was get it into a proper pot. The pond basket I chose was huge by comparison to its previous home but now I’m starting to think that it’s time to move it to something bigger.

By July 2014 it had grown enough for me to start work on that horrible cut.

July 2014 - before pruning

Realising that too much pruning would stunt its growth, I limited my other work on it to removing one of the two leaders as well as one small branch low down. I also did a bit of wiring.

July 2014 - after pruning and wiring

Looking at the photos now I’m starting to wonder whether I should have kept both leaders, but what’s done is done.

All is not lost however. Today the second leader is a slender twin trunk tree, about 50cm high, which I hope to train into a “proper” bonsai one day. For now, however, it has a lot of fattening up to do. A bigger pot is a must.

Cutting - November 2016

In the two years since I removed the second leader, my Ginseng Ficus has been left to grow as much as it’s able, its growth restricted only by the size of its pot.

November 2016 - before wiring

This week I decided it was time to do a bit more wiring as the branches I’d wired previously were growing upwards once more. While doing so I removed a couple of insignificant branches that were growing in the same space as the ones I’m trying to develop.

November 2016 - after wiring

No other pruning was done as the trunk and branches still need to fatten up significantly. For now I’m just happy that the trunk is starting to blend into the base and the scar where I tidied up that ugly cut is healing nicely.

Scar at graft site - rear view

This tree still has a long way to go before I can even think of calling it bonsai, but I’m happy with the progress I’ve made thus far.

Updated photos appear here.