Showing posts with label cuttings. Show all posts

Saturday, 24 August 2019

Two Weeks Without Drainage

I can't believe it's been four months since my last post.

Okay, I guess the fact that it's winter in South Africa counts as an excuse of sorts because I haven't been working on my trees that much. Not even the last couple of weeks when I should have been busy repotting them as spring is definitely in the air. Unfortunately I've repotted very few, partly due to the fact that procrastination is one of my big weaknesses, but technology problems have played a big part too. I was unwilling to get my hands dirty while waiting for tech assistance that never arrived!

Just about the only time I've worked on my trees lately has been at workshops.

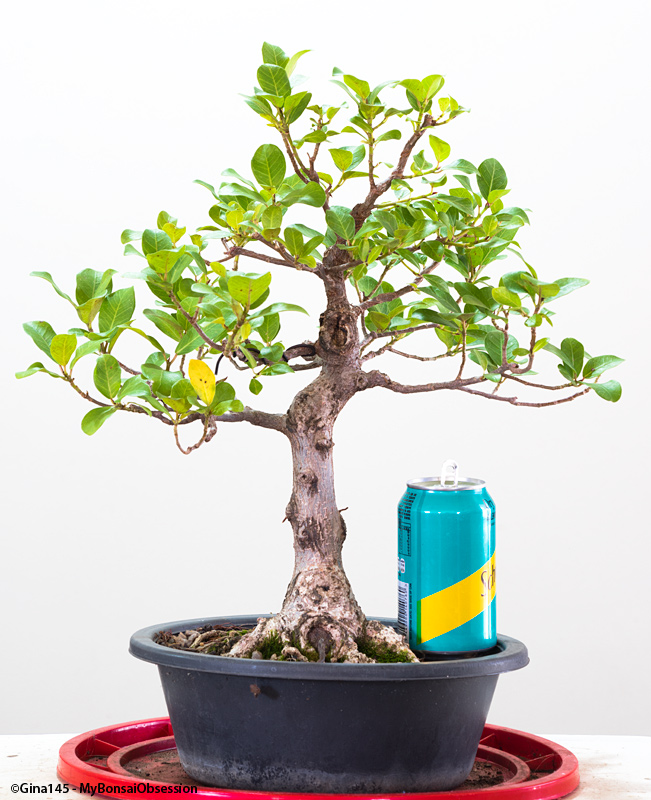
One of the trees I felt had to be repotted urgently was the fig truncheon cutting which I struggled to keep alive through a heatwave last summer. Two weeks ago it was just starting to get its first leaves so I took it to a club meeting where I could get some help lifting it out of the two pots it was living in.

I bought a few pots from the club's shop and quickly repotted the tree into one of them before the meeting started.

It's been sitting in the shade since then, looking reasonably happy, and I was planning to move it back into the sun in the next few days.

August 2019 - showing early spring growth

And then I made a discovery which forced me to change my plans.

Among the items I was packing for today's workshop were training pots for repotting some of my other trees. I was horrified to find that one of the larger pots I'd bought two weeks ago had no drainage holes. That brought the horrible realisation that the pot I'd planted my fig tree in might not have any holes either.

My fears were soon confirmed. My poor tree has spent the last two weeks in soggy soil. What's more once I removed it from the pot, I discovered that the soil was really smelly.

I've now moved the tree into a better pot with clean soil, but I'm very worried about the possibility of root rot. This tree may still be fat and ugly (though not as bad as when I first wrote about it) but it's not a tree I want to lose.

It's back in the shade for now, and I've been advised to water it with a fungicide (which I still have to buy) and hopefully that will help it to pull through. For now, however, I've got a few nervous weeks ahead of me.

You can see a full progression of this tree (including future updates) here.

Saturday, 6 April 2019

Life without roots - the cutting that refuses to die


About 18 months ago I removed a one centimetre thick branch from one of my Acacias. As I so often do when I prune my trees, I decided to see if I could that branch to root.

All summer long it was covered in foliage, leading me to believe my effort had been successful. Then one day I accidentally pulled it out of its pot. There were no roots!

I put it back in the pot and continued to treat it as I had before. It went dormant for the winter, then produced a few new leaves in spring, and its "life" went on as before.

This morning, as I was moving some of my little trees around in search of items for my club's raffle table, it got hooked onto another tree and came out of the pot again. Still no roots.

I took it along to this afternoon's meeting and gave it to an acacia lover who seemed keen to see if he could get it to root. I hope he has better luck with it than I did.


Monday, 25 February 2019

The Art of Growing Miniature Bonsai

At their most recent meeting one of my bonsai clubs (I now belong to two) had a fascinating speaker, Hennie Reyneke, who is well known for his mame trees.

Hennie holding a little Ficus Burtt-Davyi

I've seen his trees before and was delighted to get the opportunity to see how he creates his little masterpieces.

Of course, as is the case with bigger trees, creating good mame takes time, but seeing tiny cuttings transformed into the skeleton on which future bonsai will be built was really inspiring and made me feel a little bit guilty about some of the cuttings I've thrown away lately. I do however still have a lot of small rooted cuttings that I can play with and having already started trying to downsize some of my own trees, I feel certain that this is the right way for me to go.

Here is a close up of Hennie pruning one tiny tree:


Another being wired:


And the same tree after a little pruning:


As with all trees, it is important that everything is in proportion for miniatures, so you should choose species with leaves which are able to reduce well. Flowers and fruit must be naturally small as their size cannot be reduced. Big flowers and fruit on a tiny tree will look wrong!

Some of the species that Hennie recommended for miniatures are Maples, Celtis, Ficus, Cotoneaster, Pyracantha, Buxus and Lonicera, as well as conifers like Juniper Procumbens Nana.

A little literati

If you've got the patience to do so, growing from seed is a good way to grow mame bonsai because you can create taper and balance without the scarring caused by heavy cuts. Hennie also mentioned that fig varieties develop a thick buttress base if grown from seed. I have no immediate plans for trying that though as I've managed to grow ficuses with nice bases from cuttings, root cuttings and air layers. I'm really happy with the base of the Ficus Natalensis in the last photo in this post. That little tree was grown from a root cutting.

Miniature bonsai can of course also be created from small collected trees or nursery stock.

It is important to prune your little trees regularly to keep them in shape (something I'm often guilty of forgetting) and they should be repotted once a year, removing heavy roots to encourage the development of a fine root system.

One of the most difficult aspects of caring for miniatures is seeing that they are watered correctly. A good way to avoid them drying out is to stand the little pots in a shallow tray with damp river sand or gravel, providing humidity for your little trees. However over watering will lead to root rot, so drainage is just as important as it is with larger trees.

One of the styles I've never tried growing is root over rock. I've always felt that the rocks will make them too heavy for me too handle. However Hennie showed us a miniature root over rock Ficus, so I guess I no longer have an excuse not to try this style.


Thursday, 29 November 2018

The Dominant Tree

One of the benefits of growing trees from cuttings is that they'll be genetically identical to the parent tree. This is particularly important if you're undertaking a fusion project and want all the trees you're fusing to have identical foliage and, if applicable, go dormant at the same time. Neither of these things are guaranteed if you're working with seedlings.

That's not to say that identical cuttings will behave in exactly the same way.

A couple of years ago I planted three almost identical Ficus Burtt-Davyi cuttings in one small pot. That pretty much guaranteed that their treatment would be identical - the same genes, identical watering and feeding. Only minimal light variation if one tree put another into shade.

None of them have ever been pruned.

Under the circumstances you'd think there would now be three very similar trees growing in their little pot. But somehow one tree has become dominant and is now more than twice the height of the other two, with branches as thick as the trunks of its two smaller siblings.

Three Ficus Burtt-Davyi cuttings in one pot

Yesterday, when I decided to separate them, I discovered that the two smaller ones had minimal roots while the big one had filled up the rest of the pot.

Large Ficus Burtt-Davyi aren't easy to come by where I live, so I'd like to see how much I can fatten up the dominant tree. I've moved it into a bigger pot, leaving the other two in small pots for now.

It will be interesting to see how the smaller ones develop now that they have room to grow.

Three Ficus Burtt-Davyi separated

Saturday, 29 September 2018

It's fat and ugly, but it's alive

The Ficus Carica truncheon cuttings which I planted in April were by far my most ambitious propagation attempt to date. An attempt made more complicated by my decision to plant them without using rooting hormone which, I've heard, may be carcinogenic. Instead I soaked them in a kelp solution and hoped for the best.

As we were heading into winter at the time, I knew a lot of patience would be required. Ficus Carica is a deciduous tree so I told myself there wasn't much prospect of visible growth for several months.

Strangely one of the thickest cuttings showed signs of budding early on so, when the weather got cold I moved that one into my greenhouse. With limited space, however, I was forced to put the other five in a less sheltered area, on the lower shelf of a metal stand which I cover with frost cloth on nights when the temperature drops below 5°C.

By mid-August many of my trees, my established Ficus Caricas included, were already turning green, but there were no signs of life from my truncheon cuttings. Well not until mid-September, when I finally noticed a couple of buds on the thickest cutting in the less sheltered area.

A couple of weeks later the growth on that one is looking promising, so I'm hopeful that root growth is at least as good.

Late September 2018

So far none of the others are showing signs of life, not even the one that was in the greenhouse. I fear I may have harmed that one by pampering it, exposing it to excessive heat when the weather started warming up.

I'm not giving up on any of them just yet though. I made that mistake with my previous attempt three years ago only to discover that one of the cuttings I'd just dug up was starting to root. I tried putting it back in soil, but it never recovered. I really regret that because it was a far more interesting cutting than any I got this time.

I'm a bit frustrated that the cutting which has rooted is the ugliest of the bunch - no taper and it even has an ugly crack at the base. But I'm impressed that I was able to root a cutting approximately the thickness of a soda can without using rooting hormone.

I'm not convinced this tree will ever have bonsai potential but if not, hopefully in time it will give me figs to eat, something none of my other Ficus Carica trees have done so far.

Photo progression including future updates can be seen here.

Monday, 14 May 2018

Growing Big Trees from Small Cuttings

A member of Reddit's bonsai group recently asked me this question:

"What's the thickest you've ever got a tiny cutting up to? Guess I'm wondering what 10 years can do!"

The simple answer is that I made the decision early on  to restrict myself to trees and pots that I'm able to carry unassisted. As a small woman, that limits my ability to grow big trees. Still, some of them have reached a decent size over the years and if it hadn't been for some beginner's mistakes, they would have done even better.

Let's start at the beginning.


May 2018

My first Ficus Natalensis cutting serves as a good lesson in how NOT to grow a decent trunk. Yet I was once proud enough of this tree to publish an article about its early development at HubPages. That was long before I ever dreamed of starting my own blog.

I guess it works if you're new to bonsai and you're happy to grow a skinny little tree. Provided you're working with a fast growing species, that is!

After several years in a bonsai pot, this tree has been back in a training pot for over two years now but it's not making as much progress as I'd like. It doesn't help that I rarely think to rotate my trees. The back of this one was close to a wall and it now has quite a bit of die back on the lowest branches. I'll have to work on fixing that next summer.

Measurements:
9cm across the usable nebari (some roots are badly in need of pruning)
5cm just above the roots
Height 34 cm

Sometimes I'm tempted to give this one a total revamp, though probably not what I suggested a few months back. But when I think about it, I tell myself that I should stick to its original styling as a reminder of how I got started in bonsai.

This one is slightly more impressive.


May 2018

I'm guessing that it's approximately 9 years old, though I haven't had a chance to check all my old photos.

Most of the trunk growth occurred quite early in its life, before I made some styling choices I've come to regret. How I wish I'd never removed the lower branches. But what's done is done.

Measurements:
13cm across the nebari
6cm just above the roots
Height 41 cm

I'm seriously tempted to do an air layer here as I think there's good potential for a smaller tree using the top and I can make a short fat one with the bottom part.

The next one has mostly been allowed to grow unchecked.


May 2018

I'm not sure how old this one is, but it's younger than the other two.

Again I made one cut early on that I now regret. Other than that I've done little pruning, only shortening some branches from time to time. In my crowded bonsai area some of the lower branches haven't been getting enough light though and there's quite a bit of die back. That's not really an issue when it comes to styling because this tree has a trunk chop in its future - probably in the form of an air layer as early as next spring.

I recently discovered an aerial root at the bend which will make the trunk even more impressive when it fattens up.

Close view showing aerial root - May 2018

I'm not sure if I'll still be able to reposition it - I'll have to see about that when the air layer is done.

Measurements:
10-12cm across nebari - depending on final choice of front
6-7cm above roots - exclusing aerial root
Height 99cm

And then there's the easy way.


Fusion project detail - May 2018

If you don't want to wait years for a trunk to fatten up, fuse several cuttings to create one fat tree. My project is relatively small, but that's only because I couldn't cope with anything much bigger. If you've got lots of cuttings and can cope with big trees, the results can be really impressive.

Measurements:
6.5 cm across roots
Height 61cm

I'm sure this one could already have been quite a bit bigger if I hadn't left it in my greenhouse for two years. One summer outside has made a big difference.


Monday, 2 April 2018

Will a massive fig cutting root?

In the footnote to a post I wrote in January, I referred to my attempts to grow a fig tree from a thick cutting off a neighbour's full size tree, only to be thwarted by the need to save water during a period of drought.

Thankfully that drought is now a thing of the past so, when my neighbour pruned his fig tree yesterday, I couldn't resist the temptation to try again. Unfortunately by the time I found them, the branches had already been hacked to pieces, and most of them were pretty straight, with no side branches. Still, I felt I had to try.

I quickly grabbed three large branches of various thicknesses, all far too long for my requirements, so my first job was to cut each in half.

As I began to cut them up I was already starting to fear that I'd bitten off more than I could chew so I began with the thinnest one to see whether I had the strength to saw through them. That didn't take too long so I moved on to the next one, which didn't prove to be too much of a problem either.

Then it was time to tackle the monster, a branch quite a bit thicker than my wrist. Would I be able to pull if off?

There were moments when I contemplated quitting, but once I'd made a start I battled on, unwilling to see all my effort go to waste. Finally, after two hours of hard labour, I found myself with two big stumps and a total of six cuttings to pot.

I left them soaking overnight in a solution of kelp and water.

As space is a problem, today I potted them in the smallest pots that would hold them.


They're now in a sheltered spot in my bonsai area, protected from sun and excessive wind.

I know they don't look like much, just straight stumps with little or no taper, but the two biggest are pretty large - bigger than most of the trees I own. Hopefully in time something can be done to improve their appearance... if they root.

For scale here's a photo of the biggest and the smallest side by side. To give an idea of size, the smaller cutting is in a one litre yogurt tub.


As I look at the two thickest stumps now, I have to wonder how I'll cope with them if they grow. When I grabbed the biggest branch, what was I thinking?

Update:
Only one of the thickest cuttings rooted.

Photo progression including future updates can be seen here.


Saturday, 24 February 2018

The Fusion Project

In August 2015 I decided to fuse some of my long, straight Ficus Natalensis cuttings together to create one larger tree.

In order to plant them close together a lot of root pruning was required. Some had fairly substantial roots, so I was able to keep a few of the thickest ones to grow as root cuttings. The two resulting trees are doing well, but I'll discuss those another time.

Once potted I bound the bases together with self-adhesive tape. I'm not sure why I didn't bind them higher up as well, but once done I had this as my starting point:

August 2015

The base looked like this:

August 2015 - detail

As the nights were still cold (August is the end of winter here) I put them back in my greenhouse and due to space constraints they remained there for the next couple of years.

By November 2016 they were growing strongly, but when I removed the tape they were showing no signs of fusing:

November 2016 - detail

I replaced the tape, adding more higher up on the trunk, but didn't think to add movement. Here they are in December 2016:

December 2016

Finally in May 2017 I realised my mistake and tried to wire some movement into them, but after wrapping thick wire around them I found I was unable to bend the wire as much as I wanted to, so I took them to a workshop where my mentor did the muscle work for me.

Wired - May 2017

And in spring 2017 I finally moved them out of the greenhouse into a sunnier spot.

When the wire started biting I removed it and got help in rewiring them to ensure the curves didn't bounce back to their original position. After the wire started biting a second time I decided it was no longer required. This photo was taken a few days ago, several weeks after the wire was removed.

February 2018

Close-up photos show good fusion in some places:

February 2018 - detail of lower trunk

However, in other parts there are still big gaps:

February 2018 - detail of upper trunk with gaps

I added extra tape to this area, so hopefully the gap will soon close.

February 2018 - gap taped

There are a couple of additional photos here. More photos will be added to that page as the tree develops.

Hopefully by next summer the trunk will have developed well enough for me to start thinking about branch selection.

Saturday, 6 January 2018

When Branches Crack

Among the trees growing in my bonsai area is a skinny fig tree which I started from a cutting off a neighbour's tree when he pruned it in mid-2015. Although it's not much thicker than a pencil, by December 2017 it was nearly two foot tall. Yet it had not produced a single branch. I did however see signs that it was setting buds for next summer's fruit. (*)

Then disaster struck, or so it seemed. The trunk was growing closer to horizontal than vertical, so I decided to wire it into a more upright position, but with a little added movement. The trouble is I wasn't as gentle as I should have been and, while bending it to the desired angle, I managed to crack the trunk. Not a small crack either, this one went more than half way through the trunk.

On another tree I'd probably have cut back to the site of the crack and worked with what was left, but in this case I wasn't happy to do that for a couple of reasons:

  • the crack site was just below the first leaf, meaning I'd have been left with a bare stump
  • as I already have a quirky fig tree I've been working on for some time, my main focus for this one has been on trying to grow fruit. If I'm right about the buds I've seen, cutting back would have delayed my chances of getting fruit.

Although I believed the top half of the tree had little hope of survival, I decided to see if it could be saved. I manipulated the wire to bring the two sides of the crack together, then sealed it with Kiyonal paste.

By the next day the leaf at the site of the crack was starting to dry up and a few days later it fell off but, remarkably, that was the only sign of distress the tree ever showed.

January 2018 - three weeks after the "accident"

Now, three weeks later, there is new growth at the apex, but more importantly it's starting to develop new branches both above and below the crack.

Crack site - new growth is visible at the bottom

It seems that damaging the trunk was actually a blessing in disguise.


(*) I'm certain that somebody will be wondering why I started with such a thin cutting, so let me explain.

The cutting my neighbour gave me was actually big and thick, with too many branches to fit into any pot I owned, so I cut it into several pieces in a variety of sizes, hoping that the thicker ones would root. In time they may have done if we hadn't been hit by what I believed was a severe drought, but was actually relatively minor compared to the drought that is still taking its toll on other parts of South Africa.

When water restrictions were imposed I decided it was time to dispose of whatever was not alive, so I pulled most of the cuttings out of their pots. Sadly one of the thickest ones was just starting to root, but my attempts to save it were unsuccessful. Only this one skinny one survived.

I still hope to get a better fig cutting one day but for now I'm hoping that this one will fatten up. Maybe those extra branches will help.

Monday, 9 October 2017

Succulent cuttings - two years later

In November 2015 I wrote about the succulent cuttings I was trying to propagate from some broken branches I found in the garden. I should have written an update a long time ago, but with so many trees to take care of I've never given them much attention. Despite that, they're all growing well.

Cutting 1

November 2015

This was intended to be a windswept tree. Unfortunately all the thin branches have broken off and all new growth is going upwards. Clearly a lot of wiring would be needed to make a windswept tree out of this one. Given the brittle nature of this species, a better option would probably be to chop the major branches back and develop a smaller tree.


October 2017

Cutting 2

November 2015

The side branch died, but the rest is growing strongly. It's time to pick a leader.


October 2017


Cutting 3

November 2015

Lots of healthy growth, also going upwards. Another one which would probably need a lot of wiring in its existing form.


October 2017

Cutting 4

November 2015

This was two cuttings in one pot. It seems I picked a leader on the right hand cutting at some stage, but for the rest nature has taken its course.


November 2017

With our club show coming up this weekend, this is my one opportunity to sell some trees this year, and, given the fact that I haven't found time for them over the last two years, I'm probably going to sell all of these. They're all larger than I like to grow my trees and I have some smaller cuttings of the same species which I'm happier to work with.

Monday, 12 June 2017

One little Bougainvillea - three options

Over the years I haven't had a lot of success with flowering trees.

One of my early purchases was a Bougainvillea "Smarty Pants", a variety which doesn't have thorns. Soon after I bought it I took it to a workshop and came away quite happy with the styling that was done. Unfortunately, being inexperienced in transporting trees it didn't enter my mind that the tree might topple over in the car - the outcome was that one or two branches snapped off before I even had time to take a photo of my newly styled tree.

I've been battling with that tree ever since, primarily because I later discovered that I'd chosen a tree with a really bad root system. All is not lost however because I've propagated a few cuttings from it over the years.

I started this one from a thickish cutting three or four years ago.

Front - June 2017

Above is my front and below is what I've always regarded as the back:

Back - June 2017

On Saturday I took it along to a club meeting, keen to get some suggestions for its future.

I received three very different suggestions and have created a rough virtual of each option using Photoshop.

Virtual 1

This is fairly close to what I had in mind, though the back has become the front and I hadn't planned on removing the second branch on the right hand side. Although the leader is coming forward from this side I'm not too keen to have that huge scar facing forward and the right hand side looks rather bare.

Virtual 2

I'm not sure I've got the slant quite right here. This is supposed to be a semi-cascade. I'm not sure whether the tree's root system will support this style but may look into this option when I repot the tree in spring.

Virtual 3

This one is supposed to be a windswept tree. Are Bougainvilleas really suited to this style? Based on this virtual I'm not totally convinced.

Right now I've got a lot to think about but I won't be cutting anything until my little tree loses its bracts (flowers). I think a slight change of slant may be a good idea, but probably not as drastic as what's shown in virtual 2 or 3. I'm also considering a change of front to minimise the gap between the two trunks.

Here's a 360° view which may show better angles than in my unedited photos.


All suggestions are welcome.

Which option would you choose for this tree?

Sunday, 20 November 2016

Hooked on Propagation

Sometimes I wonder whether my efforts at growing bonsai are just the work of a glorified gardener. It's not that I don't want to create beautiful trees, but sometimes I doubt my ability to do so. The fact that many of the trees I see at my club are far superior to mine doesn't help. But when my desire to propagate more trees gets in the way of styling those I already own, I have to wonder where my priorities really lie.

Patience has never been one of my strengths. I guess that goes a long way to explaining why I've propagated so many trees over the years. What it doesn't explain is why I still feel the need to do so when I've already got far more cuttings and seedlings than I know what to do with.

As my collection has grown I've become a bit more disciplined, and I'm slowly learning to restrict my propagation efforts to a few favourite species, mainly indigenous varieties of Ficus. They aren't usually a problem because for the most part I simply prune as required, plant the cuttings and wait to see what grows. However I'm being held back by an air layer on a Ficus Ingens right now, and it's getting a bit frustrating because I really want to start work on developing the existing tree.

My real problem, however, is Japanese Maples. They're not even a particular favourite of mine - I far prefer the growth habits of the humble Trident Maple. But when I visit a nursery and see what they're charging for very ordinary Japanese Maples, it makes me feel that throwing away my large cuttings would be like throwing money on the compost heap.

So today I find myself facing the same predicament I did last summer (and the one before that) - should I remove those big unwanted branches? It's summer here and the only time I've had success with large Japanese Maple cuttings was in July - the middle of winter - so they're unlikely to root if I cut them now. In previous years I've decided to wait, but come July I never get around to pruning the trees, so how likely is it that next winter will be different?

Right now I've been working on the one tree that didn't offer any decent cuttings and I'm trying to convince myself to go ahead and cut the rest. They'll never make decent bonsai if I don't commit to doing what's best for the trees rather than waiting for the right time to propagate more.

Thursday, 3 November 2016

It's Alive!

At the very first meeting after I joined my bonsai club, one of the topics discussed was growing trees from cuttings. The speaker showed us how to turn an empty soft drink bottle into a mini greenhouse, allowing the cutting to live in a self-watering, humid environment until it had formed roots.

As I had already begun experimenting with cuttings, I was very excited by his talk and couldn't wait to try this method out for myself. This photo shows one of my early attempts.

Cutting in mini greenhouse

This little Abelia cutting came from a tree in my garden. It rooted satisfactorily and is still living happily in my bonsai area.

For a while I was very happy with the results I got using his method, but then I grew more ambitious and wanted to grow cuttings that were too big to fit in soda bottles, so I've had to adapt my methods over the years. Today I've got so many trees that I don't pamper my cuttings as I once did, but usually put them in my greenhouse where they get their humidity from the surrounding trees. However one habit that has persisted is that wherever possible I try to start my cuttings in transparent 'pots' so that I can see when roots start to form.

That's what I did with the piece I chopped off the tree featured in my post Clip and Grow Ficus - the Second Chop.

To be honest I never expected that one to survive though. It was chopped at a meeting of my bonsai club and left standing in an unsuitable area for a couple of hours afterwards, so it was already looking quite droopy by the time I got it home.

Droopy cutting - August 2016

What you see in this photo is nothing compared to its sorry appearance a few days later as all the leaves started to shrivel up and die. All I could do was leave it on its shelf in my greenhouse and hope for the best.

Happily new leaves soon started to appear, so I was optimistic that it would root after all. And finally a couple of weeks ago I started to see the roots I was looking for.

Healthy cutting - November 2016

Today the roots are looking really good.


I've got so many of these ficuses that I decided to try an experiment with this one. Instead of letting it grow unrestricted, I shortened the top branches to try to promote growth lower down.

November 2016 - after a slight trim

I've got memories of trying this on a similar cutting a few years ago, and that one fattened up much faster than most of my other cuttings have done, so I'm hoping I'll be able to replicate the result.

Wednesday, 14 September 2016

Is Rosemary good material for bonsai?

This is a Rosemary plant I started as a cutting about eight years ago, shortly before I killed its parent in The Great Vinegar Disaster.


Rosemary - September 2016

It has spent most of its life in its current pot, which has a diameter of 20cm (±8 inches). As a result the trunk still only measures 1.5 inches across the base. That's alright for me though because I like to keep most  of my trees small.

The trunk has quite nice character:

Close-up from previous photo

Unfortunately I'm finding it really hard to develop a good branch structure on this tree and some members of my club have dismissed it as a lost cause.

I'm not ready to give up yet. Perhaps a good trim will help with back-budding. Then again, in this case it may not.

Thursday, 17 December 2015

Can I grow bonsai indoors?

I've been hanging around Reddit's bonsai group for a while now and, despite my early reservations after receiving some pretty harsh criticism, I'm finding it a really good place to learn.

A topic that comes up for a lot of debate there is whether it's possible to grow bonsai indoors. Some people insist that it can't be done, while others are more open-minded about the idea. What is certain is that some species cannot survive for long indoors and many newbies are in for a shock when they discover that their recently-acquired Juniper bonsai is dead or dying because they were misled into thinking that it could be kept on their desk.

Click here to buy the book 
I confess that when I first became interested in bonsai in around the year 2000, I too wanted to grow my little trees indoors. I knew very little about plants in general back then, but I'd already come across a book about indoor bonsai, so I had no reason to doubt that it could be done. One of my problems was that there weren't too many sunny spots inside my house and I hadn't heard of grow-lamps back then. My early attempts were consigned to the sunniest spot I could find - in the kitchen.

My first two trees were an Azalea and a Ficus, and with the ignorance of a beginner, the first thing I did was plant them in bonsai pots. Neither survived very long. I can't say for sure that it was being indoors that killed the Azalea as I'm sure I must have made other mistakes too. The Ficus, however, certainly could have survived inside if I'd cared for it properly, and I know that its death was entirely due to stupidity on my part.

I was not deterred, but refrained from putting my next batch of trees into bonsai pots and didn't even put much effort into styling them. In fact they spent their early years living with me as house plants. I still have two Ficuses I bought during that period. They now live outside and are slowly being trained into bonsai.

Another early acquisition which survived my early abuse was an Acacia Burkei, a tree which it has always been claimed needs to be outdoors. I've proved that they can survive on a sunny windowsill, but keeping mine there had disastrous consequences, if only because I gave it minimal care. Actually that tree did a lot more than survive, it thrived there... but in so doing the branches grew through the burglar bars covering the windows and when I finally wanted to move the tree, I was forced to cut off all the branches and start over. Had the tree been a Juniper, that would have been a death sentence. My Acacia now lives outdoors too and has developed some decent new branching.

Everything changed when I joined my club in late 2007. That was when I started to realise that even trees which can survive indoors are better off being outside when the weather allows.

Shortly after joining the club I started an experiment to see how keeping a tree indoors affected its growth. I started with these two young Ficus Benjamina cuttings:

Two cuttings at start of experiment

The cutting in the green pot was kept outdoors, while the one in the red pot was kept in my kitchen in rather poor light. After six months the difference is very visible in terms of both size and leaf quality. The leaves look so different that they don't even look like the same species.

Two cuttings at end of experiment - five months later

When the experiment ended I attempted to put some shape into the indoor tree, but in its weakened state the shock of wiring was too much for it and it died. The outdoor tree was with me for several years before I sold it at our club show. To the best of my knowledge it is still alive.