Saturday 28 January 2017

A Year Spent Watching a Trident Maple Grow

At some stages in a tree's development it's best to do nothing other than leave it to grow. Such was the situation with the Trident Maple I first discussed in my post Building a Trunk in late 2015.

It was unfortunate that I was forced to repot that tree at the time that I cut the trunk back because I'm sure that the heavy root pruning I did back then has slowed its development somewhat. Still it's grown a lot since I picked my new leader - the lower of the two options I discussed in that post. The thin flimsy leader  has thickened substantially and now extends about three feet above the chop site. I also have a branch where there was little more than a bud when that post was written. This is what it looked like after a year of unrestrained growth.

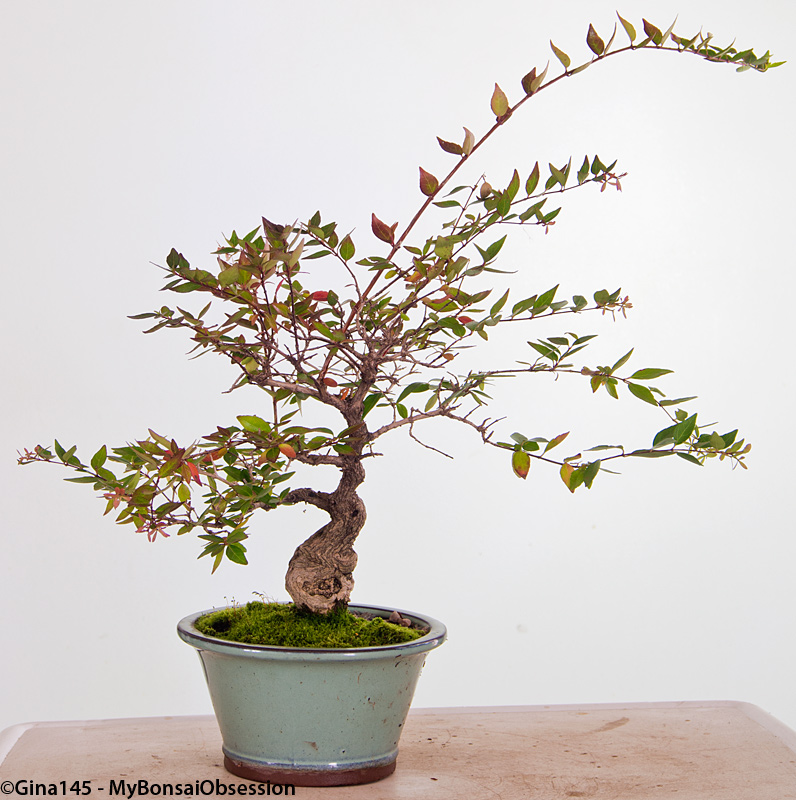
January 2017- before trim and wiring

I won't even think about shortening that leader for at least another year as it's not thick enough yet. Besides I'd like to fatten up the trunk a bit more too.

When I brought it inside today, the photo above was all I had planned but on closer inspection I decided it was time to position the side branch properly while it's still young and flexible. At the same time I shortened the branch because, for now, my main focus is on thickening the leader. I don't want that branch to fatten up too much until I start developing other branches either because I'd hate it to grow out of proportion to the rest of the tree.

Branch pruned and wired. The leader was left intact.

Just when I thought that I was done I realised that I needed to clean away the moss growing up the base of the trunk. In so doing I discovered that the base is actually somewhat thicker than I realised. Rotating the tree I also found that the base looks better from what I thought was the back of the tree, while the rest of the tree doesn't really suffer from a change of front.

New front. The section below the wire was hidden by the moss.

I'll need to change the slant when I repot it because it's now leaning slightly backwards, but that's only a minor issue. I'll also have to remove the root marked with an arrow in the photo below.

View of base from old and new fronts.

As it's already late in the growing season I'm planning to leave dealing with both of those issues until spring when I'll probably move the tree into a bigger pot.

I've been battling with this tree for years now, but at last I feel like it's starting to show some promise. It still has a long way to go though.

Friday 27 January 2017

My Purple Maple


Just a teaser for an upcoming post.

When I came across a link to an advert for "sky blue maple seeds" on Reddit, I thought it might be fun to turn one of my own trees purple just to show that those trees aren't that rare - with a bit of computer manipulation.

Aside from the colouration and slightly artistic edit, this is what my tree looked like before I pruned it a few days ago. Once I've managed to sort through all my old photos, its life history will be revealed.

Wednesday 25 January 2017

An Air Layering Blunder

During my time growing bonsai I've propagated a number of trees by air layering unwanted sections off the ones I already own, and most of them have been done using the tourniquet method. It usually works very well, and the air layer I first mentioned in my post about my family of Ficus Ingens proved to be no exception. Well not until the time came to separate the top from the parent tree anyway.

Last week everything was looking good to go.

Air layer with a decent amount of roots

Once I'd made the first cut, severing the two halves of the tree, I noticed that the roots were coming from two points - one just above the tourniquet and the other quite a bit further down the trunk. Not ideal positioning if I wanted to create a decent root system in the future. So, assuming that most of the roots were coming from above the tourniquet, I made my next cut just below the wire. Bad mistake.

To my horror I found I now had a small tree with very little root growth and a stub of trunk with lots of roots.

I planted both in the wide, shallow pot I'd prepared, then realising how unsteady the little tree was, I made some holes in the side of the pot to tie it in place without disturbing the roots again.

Two sections in one pot. The arrow shows the stub which has most of the roots.

Here's the new tree, defoliated to reduce the stress on the tiny remaining root ball.


All I can do now is wait to see whether either section survives.

A week later the new tree is showing no signs of dying, so I'm hopeful that all is not lost. As for the stub, who knows? Some species of Ficus can be propagated from root cuttings. I'm just not sure whether Ficus Ingens is one of them.

Whatever happens my top priority for the immediate future is the parent tree.


All I had was one branch which I've wired upwards as a new leader. The trunk is rather long and straight so, depending on what develops, I may opt for a shorter tree later on.

I'm really impatient for it to produce some branches lower down so that I can start working out a plan for its future.

Wednesday 18 January 2017

When the Weeds Take Over

This little olive tree is one of the rare trees I've bought as bonsai stock, meaning that it required a lot less work than most of my other trees do. Here it is as purchased at our club show in October 2010.

Olive tree - October 2010

I was quite happy with the way it looked in the spring of 2015 and was planning to move it to a bonsai pot but for some reason I never got around it it.

Instead it got lost among my bigger trees and I failed to notice the little Melaleuca seedling which planted itself at the side of the bag. By the time I discovered it, it was too deeply rooted to simply pull it out and move it to a pot of its own, so I left it there and waited for a suitable time to move it. And, as is my wont, I forgot all about it.

Now it had become so tall that it was totally dwarfing my poor little olive tree.

Olive tree and Melaleuca 'weedling'

Something had to be done about it. Unfortunately it's mid-summer in South Africa - not the right time for repotting trees, so that will have to wait. (It's on my brand new list of things to do in Spring though, so hopefully it will finally get done this year.)

For now I decided to cut it down to a more suitable height so that it doesn't interfere with the olive tree more than necessary.

Olive tree and Melaleuca 'weedling' after chop - January 2017

It's a shame I had to do that because the Melaleuca was growing so vigorously that I'd have loved to see how much it would fatten up with another couple of years of unrestrained growth. I'll have to content myself with trying that out with one of its younger 'brothers' - another weed which I rescued before it was established in the pot in which it took root.

Melaleuca seedling - January 2017

Sadly fattening this one up is going to take much longer. The one positive is that I was able to wire the trunk to add a little movement while it's still young and flexible.

Melaleuca seedling after wiring - January 2017

While I was at it, I tidied up the olive tree.

Olive tree, after trim - January 2017. The Melaleuca is hidden behind a piece of white paper

While doing so I discovered that it had suffered a little die-back. Fortunately I caught it now. It could have been a whole lot worse.

Friday 6 January 2017

A Neglected Abelia Bonsai

In 2010 I received an unexpected gift from a senior member of my bonsai club - this Abelia:

August 2010 - as I received it

As we have a large Abelia growing in our garden, I already had a few little trees which I'd grown from cuttings, but this one's trunk had a lot more character than my others, aside from one flaw - some nasty reverse taper right at the base:

Interesting trunk with a really skinny base

My first step was to move it into a deeper pot but, perhaps unwisely, I made no attempt at layering it. In effect I was hiding the reverse taper rather than dealing with it.

By October 2011 I had a couple of new branches.

October 2011 - before pruning

It was time to get rid of the handlebars and select a new leader.

October 2011 - after pruning

Over the next couple of years it grew quite well, and with a few trims it was starting to look quite good. In the spring of 2013 I moved it to a bonsai pot (another gift) in time for the club show. The deep pot was not ideal but it was the only way to hide the reverse taper.

October 2013

Not much happened over the next two years during which it made a couple more appearances on club shows. Then, when I was looking for trees to display at last October's show, I discovered that I'd been paying this one too little attention and that it was in no condition to go on show.

Still I did nothing. I had too many other trees that needed my attention.

Finally today I decided it was time to fix up some of the mess. My tree now had some vigorous growth where I didn't want it - like the branch heading up to the top of the photo - while there was a lot of die-back to branches I really needed.

January 2017 - before pruning

I've now removed all the dead branches as well as a couple of upward growing ones that didn't belong and shortened everything else to encourage back-budding.

January 2017 - after pruning

Once I see how it develops I'll have decide whether I want to revert to the style of 2013 or whether to try to develop a slightly larger tree. And next spring I really need to see if I can pot it a bit lower as the reverse taper is starting to show again.

Monday 2 January 2017

Most of them survived

In October 2015 I wrote about a newly acquired Stinkwood tree which was drowning in Maple seedlings.

Weeds and seedlings - October 2015

With a little gentle poking around in the surface soil I was able to extract 25 seedlings, each of which was planted in a small plastic cup with drainage holes.

23 of them survived.

For the last year they've been living largely untouched on the lower shelf of a small stand in a fairly sheltered area - a spot chosen to protect them from the hail which has left some of my better trees looking rather the worse for wear.

Now they've had a chance to grow a bit its time to start putting movement into some of their trunks.

Before starting work I decided to bring them inside for a family photo:

23 seedlings - January 2017

That was when I discovered that, while the front ones had been growing vigorously, some of those at the back were still tiny and were nowhere near ready for me to work on.

Size comparison

Clearly those needed a lighter spot.

I decided to relocate some of the other trees on the stand so that the smaller seedlings could be moved forward without compromising the position of the bigger ones.

After returning the weakest trees to the stand I was left with 15 trees to wire. I've started work but it will probably take a few days to wire them all.

I've been fairly conservative with the movement I put into the biggest tree.

Tallest tree after wiring

I'll try to be more adventurous with some of the others.