Monday, 28 March 2016

Ficus Ingens - creating a family of trees

April 2012 - as purchased
This is a tree I bought at a local nursery in April 2012. At the time it was about 3 foot tall and straight as a pole, but it had two things going for it - it had decent nebari (roots) and it was a variety of ficus which I didn't have in my collection. It was also really cheap.

It's a Ficus Ingens, the red-leaved fig. The foliage starts out red, but as it matures, it turns green. The leaves are quite large, but I believe that they reduce well so I'm hopeful that it will make a decent bonsai one day.

I love to propagate my own trees so my first step was to air layer the excess height, which in this case meant everything about the first couple of branches. I'm not sure when I started the air layer, but I'd guess that I waited until the South African spring, so that would have been late 2012.

Ficuses tend to air layer very easily and by February 2013 I was the proud owner of two trees - one long and straight, and this little one on which I could start work developing branches:

February 2013 - after removing air layer


Once the top had been removed the existing branches started to grow well and, despite one trim, by June 2014 it looked like this:

June 2014 - before pruning

At that time I took it to a workshop where I was persuaded to remove the lowest branch, something I now feel may have been a mistake. After some hard pruning, this is what was left:

June 2014 - after pruning

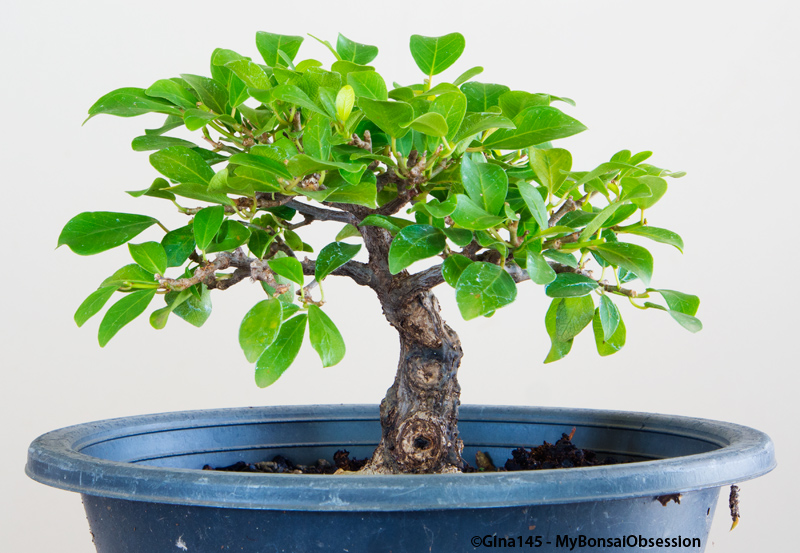
Since then I've pretty much left it to grow, and it currently looks like this:

Current appearance - March 2016

Now I'm starting to wonder what my next step should be. I considered reducing the height but I'm wondering whether I should develop it into a slightly taller tree than I originally planned. I don't want to rush the decision so for now I've done nothing.

Any suggestions would be welcome.

Here's a 360° view:


While the original tree was growing branches, my new tree was fattening up quite nicely but all of its branches were high up, so last summer I air layered a small section off the top in the hope of encouraging more branching lower down. My collection now consists of these three:

The tree and its offspring - March 2016

Despite my efforts the tall one still has no low branches, so this week I decided it was time to start another air layer just above the lowest branch.

New air layer on the tall tree

Now I'm impatiently waiting for roots to develop.

Sunday, 13 March 2016

Breaking all the Rules

I know I've written at length about my fig tree, but I thought one last update would be in order before the Southern hemisphere winter arrives. Already the days are getting shorter and there's a nip in the morning air, so this tree will soon drop all its leaves. I can't see anything changing between now and spring, so you won't have to read about it again until at least September.

This tree has changed a lot over the course of this summer, and most of what I've done has gone against advice I've been given both online and at my club, but that's okay. It's my tree and I'm the only one who has to like it.

December 2015 - before pruning

This is what it looked like in December, before I started work on it. A strange twisty trunk low down with a dead straight top section. My plan was always for a short tree though, and all that height was just to thicken up the apex.

When I took it to my club for a crit just after this photo was taken, I didn't expect any positive feedback, but I did get some, and based on the advice I received, I cut it back to this:

December 2015 - after pruning

It didn't take me long to realise that I hated that as a front, so I started exploring my options, finally cutting them down to three possible fronts before deciding that the one I thought I liked best was probably just a bit too out of the box. All the while I was gradually cutting down on the number of branches, and by the time I took it to a club workshop today, only two remained.

Fig tree - before season's last pruning

I was determined to get rid of one of them, but should have known better than to ask for other people's opinions. Out of all the people I asked, only one agreed with my strange decision, and some even questioned my choice of front, preferring an angle that I dislike.

Sometimes I give in to others' opinions, only to regret it. In this case, however, I was not to be deterred from what I wanted to do. However, after hearing what was said, I did a little unplanned wiring to the leader. I also tweaked the front ever so slightly.

Fig tree - March 2016

In spring I'll repot it again, because I really want to bring it a bit more upright, more or less how it looked when I tilted the pot for this photo.

Proposed angle for repot

That will require a bit of root work though, because there are some really heavy roots at the back. After that I'll leave the side branch to thicken a bit, but I won't let the apex grow too much higher because I'm not planning to let it thicken much more and I really want to start working on ramification.

Friday, 11 March 2016

Clip and Grow Bonsai

An article I read last night indicated that wiring is almost essential to the bonsai process. That's not what I wanted to hear. I try to keep the amount of wiring I do to an absolute minimum.

The reason I dislike wiring is partly down to sheer laziness. It takes a lot of time and patience to wire every branch of a tree, right down to the tiniest twigs. And then there's the need to watch the tree closely to ensure the wires are removed before they bite so hard that they create deep scars which may never heal completely. That becomes a problem when you've got as many trees as I have.

But I've got a better reason. I'm okay with wiring thin branches, but my hands aren't strong enough to cope with heavy wire and even if I succeed in applying it, bending a newly wired branch into the desired shape is often beyond my capabilities. I don't want to become too dependent on the men at my club to do that for me. I'd hate to think that all my trees were the product of someone else's labour. Where's the fun in that!

Followers of the Lingnan School of Penjing grow naturally styled trees using the clip and grow method. I'd like to learn more about the steps they take in the development of their trees, but I'm struggling to find any literature on the subject. It's never been discussed at my club either.

So I've been trying to solve the riddle for myself. I have one little tree that has never been wired:

Ficus Natalensis - March 2016

It's one of the two I discussed in my post Two Ficuses - Bonsai in Training. The second tree in that post has had the two lowest branches wired once to reposition them slightly.

Ficus Natalensis - March 2016

Today I'm discussing a tree which is still in a much earlier stage of development. I'm taking this one really slowly.

Ficus Natalensis - March 2016

It doesn't look like much from this angle, but the good part is hiding behind the lip of the pot.

It's another Ficus Natalensis (indigenous to South Africa), genetically identical to the two above. They're all trees I propagated from either branch or root cuttings. Well strictly speaking this one propagated itself. I'd cut a surface root off its parent tree but didn't remove it from the pot. Having started life in a shared pot, the tree naturally grew at a slant as it reached for light beyond its parent's shadow.

Before I repotted this tree I'd made the mistake of growing most of my trees upright. Fortunately I had the sense to keep this one at its chosen angle.

Ficus Natalensis - December 2012

I'm not sure how long after I separated it this photo was taken, but it must have been a while because it was looking rather pot bound. This was what it looked like after its first pruning, one which I realise with hindsight was rather premature.

I didn't do too much to it for the next year. Then I discovered a photo which I took as inspiration for styling a slim slanting tree. At that stage I picked a new leader, leaving me with this:

Ficus Natalensis - December 2013

The tree, however, had other ideas and soon put out a lot of low growth.

Ficus Natalensis - March 2014

Seven months later it was looking nothing like the tree I'd planned.

Ficus Natalensis - July 2014

By then I had a new idea about where I wanted to go, but I wasn't going to rush things, so I waited another eight months for my new leader to thicken, then made a really drastic chop.

Ficus Natalensis - March 2015

In the last year it's grown quite vigorously and that leader has thickened substantially.

Ficus Natalensis - March 2016

When I brought it inside to photograph it for this post, I removed a couple of unwanted aerial roots and one tiny branch from where there were two growing at the same point. I'm not planning to do anything major until next summer, when I plan to move it to a bigger pot. For now I might shorten some of the top branches to encourage more growth lower down, but that's about it.

My future plans are to do another major chop as illustrated here:

Planned spot for future chop

Before I do that, however, I want both the current and future headers to thicken up a bit more.

Just where it goes after the next chop remains to be seen. As this tree has had a major say in every step I've taken so far, it may well make that decision for me.

I've no idea how long it will take before this tree starts to resemble bonsai, but that's okay. I'm prepared to wait as long as it takes.

Tuesday, 8 March 2016

A Celtis from the Raffle Table

This is a tree I won on a club raffle in August 2015, right at the start of the South African spring. It's the Celtis Africana (White Stinkwood) which put in a brief appearance in my post Drowning in Seedlings in early October. At that stage it looked like this:

White stinkwood bonsai in training

My main emphasis in that post was on the weeds that accompanied the tree, many of which turned out to be Trident Maple seedlings. I'm happy to say that my rescue job was successful and I now have 23 baby maple trees growing in repurposed plastic cups.

But back to the Celtis. Though it's by no means my fattest tree, it's about 50 cm high, making it one of my tallest.  I actually prefer short, fat trees, but sometimes I'm forced to work with what I've got. It's already a little shorter than it was when I got it because the apex was really heavy and was growing off to one side.

I pruned it hard in early summer and it's been growing quite vigorously since then. This is what it looked like before its latest haircut:

Before pruning - March 2016

Today I decided to tidy it up a bit, removing branches that were growing straight up or down and shortening some others. However I've left some branches long as I need those to fatten up a bit before I prune them.

This is how it looks after pruning:

After pruning - current front

I'm not particularly happy with this tree though. Despite the fact that several people told me I'd won a nice tree, I've got a couple of issues with it.

For starters I'm not too happy with the big gap between the two lowest branches on the left. The previous owner had tried to force another branch into that space but it had been pulled across the front of the trunk and didn't look right that way. In any case it was very close to the remaining branch, so the gap wasn't that much smaller.

Aside from that I'm not convinced that this is the correct front for the tree. The base looks really narrow and misshapen from this side:

Current front

There are two angles from which it appears to have a much better base. Unfortunately neither really fits in with the current styling of the tree.

The first option that presented itself to me was this one:

Second option for front

It's wider, but imperfect because there is a big bulge just above the roots. Although this angle works well with the direction in which the apex is growing, the first branch points directly to the front and I'd be forced to remove it leaving no low branches at all.

After pruning - second option for front

Probably the best option if you consider the base in isolation, this one has a nice spread without the bulge:

Third option for front

Once again it presents problems though. The first branch is now pointing to the back, which isn't ideal. To make matters worse, from this angle the apex is growing towards the back too.

After pruning - third option for front

I took this tree to a workshop a couple of months ago and was advised to live with the current front, but I'm not sure I want to. I think I'll take it to my bonsai club's next meeting and see if I can find someone who has a creative way to solve my problem.

I'm even prepared to do an air layer and turn it into two trees if need be.

Sunday, 6 March 2016

I Should Have Known Better

"Cactus" as purchased
When I bought my so-called cactus (since identified as a Pachypodium Saundersii) in the spring of 2015 my decision was made despite some serious discouragement from my mother who didn't want a plant with dangerous thorns invading her personal space.

It wasn't long before I started to wonder whether I should have deferred to her better judgement. Although I knew exactly what I planned to do with my "tree", the prospect of actually doing the job filled me with dread and I kept putting it off as if hoping that the work would do itself.

Eventually in February I took the easy way out and took it to a workshop where the hardest part was done for me.

"Cactus" pruned and planted in bonsai pot - February 2016

By the time it was safely tied into its bonsai pot my doubts had intensified and I was already contemplating the possibility of selling it or if necessary putting it on my club's raffle table. But I still held on to the hope that in time I'd learn to love it, and even took inspiration from this comment from one of my Reddit readers: "Kind of looks like bonsai from another planet."

At that stage my attention turned to gathering information about the species and working out how I was going to keep it alive during the upcoming winter. Although our winters are relatively mild, I have to protect some of my more sensitive trees from cold winds and frost, but it sounded like this one would be more tricky than most.

Meanwhile I left my "cactus" in a shady spot to recover from the trauma of root pruning but, with so many other trees to care for, I didn't pay it as much attention as I should have. About a week ago I became aware that its leaves were starting to dry up and in the days that followed I became increasingly concerned that something had gone horribly wrong.

On Thursday I saw the man who ran the workshop at which it was repotted, so I told him what had happened. He suggested I remove it from the pot and let it dry out for a couple of days. I was reluctant to handle those thorns more than necessary and put off inspecting it further until today, when I discovered that the base of the trunk had become extremely soft, a sure sign of root rot. Clearly this was the effect of over-watering.

Dead cactus - March 2016

I've seen this happen to other people's baobabs, which is one of the reasons I've never bought one. In some cases their owners have been able to save the trees by cutting off the part which has rotted and treating what's left of their tree as a cutting. I decided to see if I could do the same with this succulent, but it proved to be a lost cause. It was too far gone.

So, in answer to the question "Can I bonsai a cactus?", which I posed in my earlier post, the best I can say is perhaps with the right treatment it can be done, but I won't be trying again.

In closing it's only fair to admit that although she's never grown bonsai, sometimes Mother does know best. I certainly wish I'd taken her advice and resisted the temptation to buy a plant I knew nothing about.

Tuesday, 23 February 2016

A Pleasant Surprise

It's been nearly four weeks since I removed the air layer from the mulberry tree outside our house. At the time it looked like this.

After cutting back and potting - January
2016
When I shared my previous post about this tree at Reddit, I was asked why I'd defoliated it. I'm not really sure whether it's necessary, but it's something that was recommended at my bonsai club, and it's always worked for me. In any case the foliage that was left on the tree after cutting off the top was all rather dry after long exposure to the hot sun and would probably have fallen off anyway.

The decision on whether or not to defoliate is species specific however. Defoliate the wrong tree and it will die.

I'm happy to report that my mulberry tree has done fine without its old leaves.

After I'd potted the tree I put it in a shady section of my bonsai area which is reserved for trees that have recently been repotted. My smaller trees usually go under a table, but this one was too tall to fit there, so I put it behind the table. As a result the top section got a lot more light than the rest, which may explain why that's where all the new growth has appeared.

The two trunks are crossing high up

Once new growth started to appear I moved it into a position where it gets some morning sun, and now I'm hoping that I'll get some foliage lower down. That's where I really need branches because, even if the tree fattens up considerably in the years to come, it is still far too tall.

You'll notice in the above picture that the tops of the two trunks were crossing. As that section will be removed one day, it probably wasn't too serious, but it doesn't look good that way, so I decided to do some rough wiring to separate them.

Roughly wired to separate the two trunks

For the foreseeable future I will be letting this tree grow wild. If this strong growth is any indication of what's to come, I'm hoping it will fatten up well, and I'm in no hurry to start styling it. I'm still uncertain whether I will keep the two trunks or try to separate it into two trees. I'll have to inspect the roots to see which is the appropriate direction, but that will have to wait a year or two.

And finally the surprise - when I examined the tree closely a couple of days ago I found a few small fruit developing on the new growth.

A small fruit on the new growth

It's the wrong time of the year for mulberries, so I doubt they'll ripen, but it gives me hope that this tree will give me fruit in future, something which most of my smaller mulberry trees have failed to do.

Sunday, 14 February 2016

Can I Bonsai a Cactus?

Although I was anything but an enthusiastic gardener as a child, I have clear memories of wanting a cactus. My parents very nearly bought me one too, but somehow between my selecting my plant and going to pay for it, I managed to get a mass of thorns stuck in my hand, and after that good sense prevailed. I never did get my cactus. Well not until recently.

I've got a few succulents I'm training as bonsai but they've never been my favourite material to work with because the branches tend to break rather easily. So I'm not sure what possessed me on the day I decided to buy this cactus with the intention of turning it into bonsai.

Cactus as purchased

I'd been to a bonsai show at a fabulous garden centre about an hour away from home and after viewing the show it was only natural that I had a good look at everything they had for sale in the nursery even though I didn't really want to add anything to a collection that is already far too big.

I rarely buy from the bonsai section at nurseries because they tend to have mediocre trees and even the pre-bonsai have really high price tags, but I love to look at what's for sale anyway. Fortunately I was able to avoid temptation in that section, so I moved on to looking at their garden trees. Still nothing took my fancy.

And then I saw that cactus with its rather tree-like structure. Those two long stems with their fat bases said twin trunk bonsai and hard as I tried to resist the temptation, as I wandered through the rest of the nursery I couldn't get it out of my mind. In a moment of madness I bought it.

Once I got it home, however, the doubts began to set in. Where was I going to keep this plant without risking someone getting hurt? I tucked it away up against a wall, behind some of my other trees. Strangely, despite my doubts, I felt my usual temptation to grow the unwanted pieces as cuttings, though I knew I shouldn't. I was torn.

Decision making has never been one of my strengths, so I took the easy way out and did what I so often do in situations like that - nothing!

That was several months ago.

Finally today, realising that autumn isn't too far off, I decided that something had to be done, so I schlepped my cactus to a club workshop, all the while wondering whether everyone would tell me I was crazy to attempt to bonsai this unusual material.

Surprisingly nobody did, though they may well have thought so. I even got help with extracting the cactus from its old pot- my helper used a thick cloth to pull it out without getting a handful of thorns.

Although I don't normally train my trees in bonsai pots, I felt I should make an exception with this one to avoid having to handle that thorny trunk more often than necessary. Perhaps it was just as well, because there was a surprise waiting for me when it came out of the pot - those two stems came from a much thicker base and exposing that base was the only way to fit it into a bonsai pot.

Cactus pruned and planted in bonsai pot - February 2016

To be honest I'm not sure I like it so much now. Seeing it in that pot has reawakened my doubts over the wisdom of buying it in the first place. Regardless, I shortened the stems to give it a more treelike appearance, and I'll see how it develops over the next few months. If I really hate it, I can always try to sell it at a club show, or if all else fails it can go on the club raffle.


Update: When I shared this post with Reddit's bonsai group, I was told that it's not a cactus. I cross-posted to the cactus sub-Reddit and have established that it's actually a Pachypodium Saundersii.

Update 2: Unfortunately this experiment did not have a happy ending. I should have known better.